
Crack Stone Crab Claws Cleanly Without Crushing the Meat
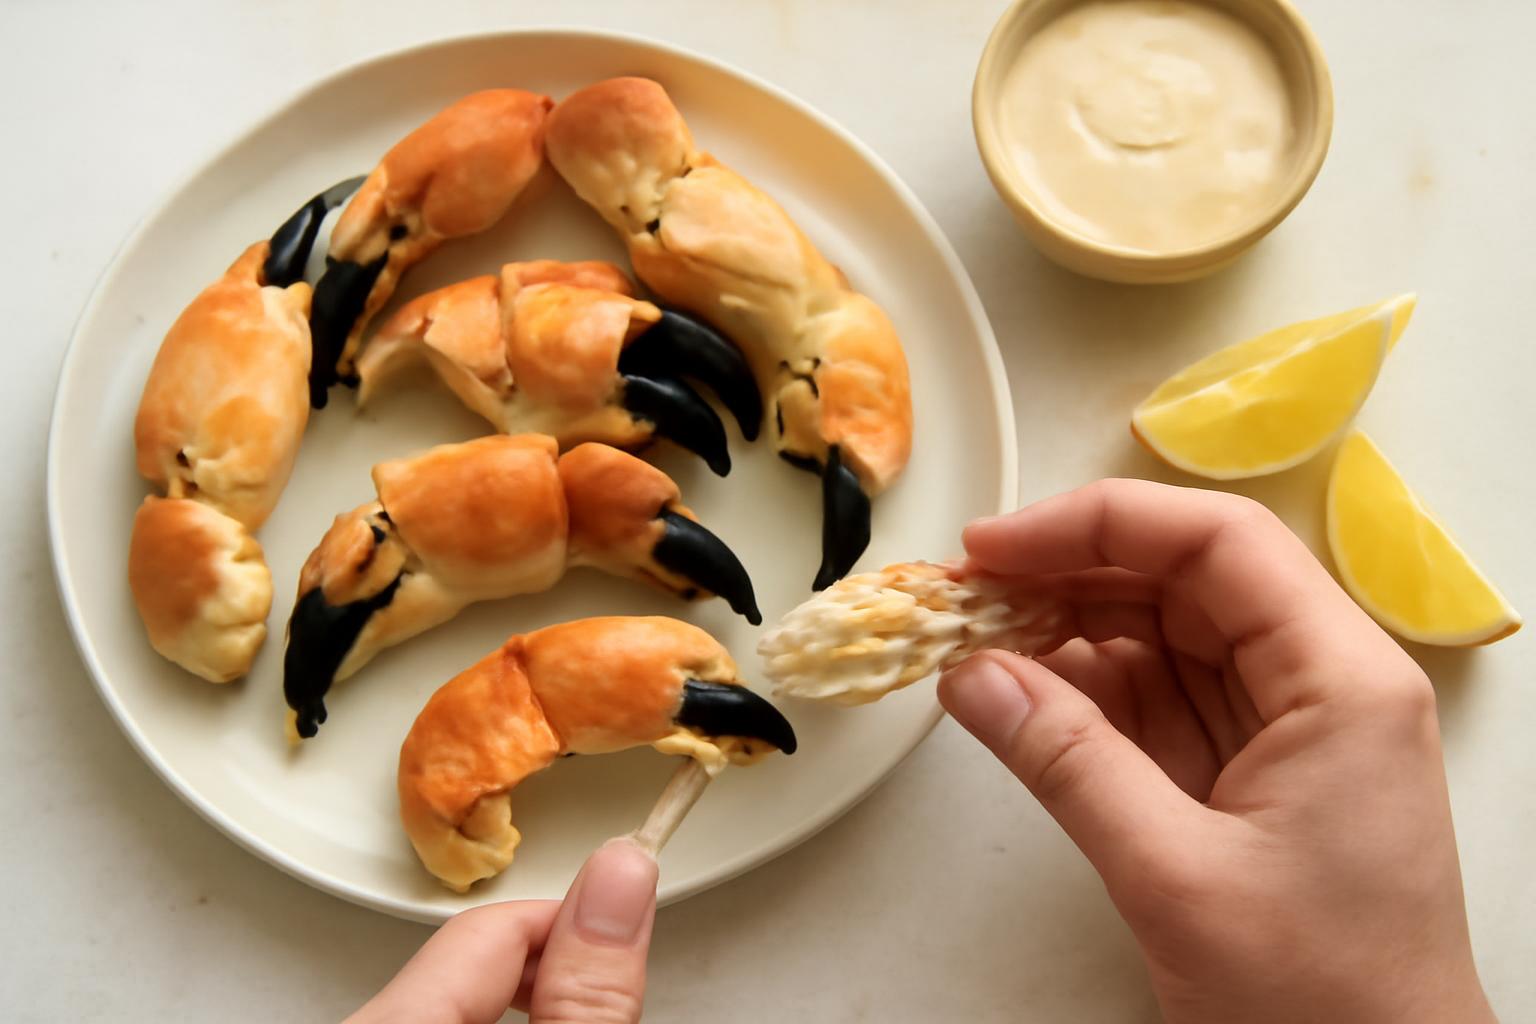
Chilled service is customary. Warming is optional and should follow the product instructions. Peel outward and inspect every piece for shell fragments.
The quick answer: how to eat a stone crab claw
Many commercially purchased stone crab claws are sold cooked and chilled or frozen, so eating them usually involves confirming their condition, thawing them if necessary, cracking the shells, and serving the meat. Always check the label, retailer information, seafood-counter guidance, or ask your server before proceeding.
Once you know the claws are fully cooked, follow this sequence:
- Thaw them in the refrigerator if they were sold frozen.
- Place one claw flat on a stable cutting board or protected table.
- Cover it with a folded kitchen towel.
- Crack the thick main chamber gently in several places.
- Crack each attached knuckle separately.
- Peel the fractured shell outward and away from the meat.
- Use a seafood fork or pick for narrow sections.
- Inspect every piece for shell fragments.
- Eat the meat plain or dip it in mustard sauce, melted butter, or lemon.
Diners primarily eat the meat inside the claws and attached knuckle sections. The claws are the customary commercial product, although some body meat may be edible but comparatively difficult to extract.
The key is restraint. Do not try to open the claw with one dramatic blow. Create several controlled fractures that loosen relatively large shell pieces. Pulverizing the shell is more likely to crush the meat and scatter fragments through it.
Cooked stone crab claws are commonly served chilled, often over ice, with mustard sauce, melted butter, or lemon. This is a recurring commercial and culinary custom rather than a rule about what tastes best. Key Largo Fisheries describes retail claws as typically precooked and chilled and recommends a gentle crack, peel, inspect, and dip process in its stone crab eating guide.
Compact restaurant-or-home checklist
- Cooked status confirmed
- Frozen claws thawed according to their directions
- Stable work surface prepared
- Towel placed over the shell
- Main chamber fractured gently at several points
- Knuckles cracked separately
- Shell peeled rather than smashed
- Meat inspected under good light
- Shell bowl and heavy napkins within reach
- Sauce served on the side
If a restaurant serves pre-cracked claws, begin peeling along the existing fractures. If the claws arrive completely uncracked, ask whether the restaurant can crack them or provide an appropriate cracker or mallet.
First, confirm whether the claws are cooked, chilled, or frozen
Do not assume that every stone crab claw is ready to eat simply because many retail claws are sold precooked. Check the package, order confirmation, retailer’s website, seafood-counter label, or information from your server.
The product will usually fall into one of three practical categories:
- Cooked and chilled: Serve it according to the seller’s directions. Chilled presentation is customary, so additional cooking may not be called for.
- Cooked and frozen: Thaw it as directed before cracking and serving. Frozen describes its storage condition; it does not mean the claw is raw.
- Uncertain or unlabeled: Do not treat it as ready to eat until the seller confirms its condition and provides handling instructions.
Do not attempt to determine cooked status from shell color or appearance alone. The available culinary guidance does not establish a dependable visual test for an unlabeled claw. Confirmation from the seller is more reliable than guessing.
For a product identified by its seller as cooked and frozen, refrigerator thawing is a common culinary recommendation. Soufflé Bombay suggests allowing approximately a day and night, but that is the author’s estimate rather than a universal food-safety standard. Claw size, quantity, packaging, and product instructions may change the required time, so the directions supplied with the claws should take priority. The same author describes refrigerator thawing and cold service in a stone crab claw recipe and serving guide.
Thawing cooked seafood is not the same as cooking raw seafood. If the label says the claws are fully cooked, automatically putting them through a full boiling, steaming, baking, or grilling cycle adds heat they may not need. The surveyed commercial sources also caution that prolonged heating can dry the meat or make it tougher.
Conversely, thawing does not resolve uncertainty about whether a product was cooked before freezing. If the label is unclear, contact the seller rather than improvising a cooking method from guidance intended for precooked claws.
Storage periods also vary among retailer and recipe sources. The evidence does not establish one refrigerator shelf life that applies to every cooked or thawed claw. Packaging, processing, transit, and the seller’s handling directions differ, so use the deadline and storage instructions provided with the specific product. For questions that the seller’s materials do not answer, consult applicable local food-safety guidance.
The available culinary sources likewise do not establish a definitive home test based on one odor, color, or texture. Do not substitute an improvised sensory test for the product’s labeling and handling directions.
Set up a stable, low-mess cracking station
A good setup makes the shell easier to control and the fragments easier to find. Avoid cracking claws over a crowded dining table or while holding them in the air.
For a beginner, assemble:
- A heavy-duty crab or lobster cracker
- A seafood mallet as an alternative
- A stable cutting board or protected table
- A folded kitchen towel
- A seafood fork or narrow pick
- A bowl for discarded shells
- A separate plate for extracted meat
- Heavy napkins
- Small bowls for sauces
- Good overhead or task lighting
A crab cracker is a practical first choice because it lets you increase pressure gradually and stop when the shell fractures. A seafood mallet also works when used with short, light taps rather than a forceful swing.
The folded towel helps stabilize the rounded claw and contain shell pieces when the shell breaks. Culinary instructions also recommend laying the claw flat, covering it, tapping with control, and turning it to work from the opposite side rather than smashing it. George Stone Crab demonstrates that approach in its guide to controlled claw cracking.
Place the cutting board on a dry, secure surface. Keep uncracked claws in one area, the shell bowl to one side, and the meat plate to the other. This simple arrangement prevents extracted meat from disappearing among discarded shell pieces.
If you do not have a specialized cracker or mallet, the back of a sturdy large spoon can serve as a household fallback:
- Lay the claw flat.
- Cover it completely with the towel.
- Tap the thick shell lightly.
- Check the result before tapping again.
- Turn the claw if another side needs to be fractured.
The spoon should be substantial enough to work with modest taps. If opening the shell seems to require an uncontrolled swing, stop and use a different tool.
Do not crack a claw while holding it in one hand. Keep the towel over the shell while tapping, and keep your face and free hand back from the working area.
Some online methods use chef’s knives or general-purpose household hammers. This beginner guide does not recommend either as a routine choice. The cited instructions do not adequately address knife handling, impact control, or whether a general household tool is appropriate for food contact. A cracker, seafood mallet, or towel-covered spoon provides a more manageable starting point.
Clear glasses, phones, decorative items, and unrelated food from the immediate work area. Good lighting is especially useful once you begin inspecting the meat for small shell pieces.
How to crack the main claw and knuckles step by step
Before cracking, identify three visible working areas:
- The thick main chamber, which contains the largest portion of meat
- The hinged gripping end, or pincer
- The attached knuckle sections, which contain narrower pockets of meat
Claws vary in size and shape, so there is no universal strike point measured to an exact location. Concentrate on gently fracturing the thick shell and opening each knuckle without driving broken pieces into the meat.
1. Position the claw
Lay one claw flat on the cutting board and arrange it so it does not rock freely. Cover it with the folded towel.
Work on one claw at a time.
2. Start with the thick main chamber
If using a crab cracker, place its jaws over the thick shell rather than the narrow tip. Squeeze gradually and stop at the first clear fracture. The shell may resist before giving way, so avoid applying pressure abruptly.
If using a seafood mallet or spoon, make one light tap through the towel. Check the shell, then repeat only as needed. Several modest taps are preferable to one hard strike.
The first fracture does not have to split the shell apart. It only needs to create a break that can be extended or peeled later.
3. Add another controlled fracture
Move the tool to a different part of the main chamber and repeat. If the shell remains rigid, turn the claw over and fracture the opposite side.
It also avoids pounding one spot until the shell collapses inward.
4. Work around the hinged end
The gripping end may retain shell around the meat after the main chamber opens. Apply gentle pressure or light taps near the hinge and surrounding shell.
Stop once the shell moves enough to peel. If one angle does not release it, turn the claw and approach from another side instead of sharply increasing the force.
5. Crack each knuckle separately
Each attached knuckle is a separate shell compartment containing a narrower portion of meat.
Position one knuckle flat beneath the towel and make a light fracture. Turn it if necessary and add another fracture on the opposite side. Aim to loosen a strip or ring of shell that can be peeled away.
Do not expect the knuckle meat to slide out simply because the main chamber is open. It often needs its own cracking and extraction step.
6. Stop when the shell is loose enough to peel
More cracking is not necessarily better. Once a shell section moves under light finger pressure, put down the tool. Continuing to tap can break manageable shell sections into smaller shards.
A controlled method preserves both larger pieces of meat and larger pieces of shell. The latter are easier to see and remove.
7. Peel outward and away
Lift a shell edge at one of the fractures and pull it outward, away from the exposed meat. Remove the shell in sections instead of trying to wrench it off all at once.
If a section resists, check whether it needs one additional small fracture. Do not pull so hard that the meat tears or the shell snaps unpredictably.
8. Use a seafood pick for narrow sections
Remove exposed meat with your fingers if it releases easily. For a knuckle or tight pocket, slide a seafood fork or pick along the inside curve of the shell and ease the meat forward with short movements.
Avoid digging blindly into the compartment. If the shell remains rigid, change the angle or add another controlled fracture instead of escalating to a hard swing. Stone Crab Club’s step-by-step eating guide similarly recommends gently opening the hinge, knuckles, and gripping section before using a pick for smaller pieces.
Extract and inspect the meat before taking a bite
Cracking opens the claw, but the meat still needs to be separated from loose shell.
Peel away the fractured sections and place each exposed piece of meat on a separate plate. Keeping the meat away from the shell bowl makes fragments easier to notice.
Large pieces from the main chamber may lift out intact. Knuckle meat is more likely to remain tucked into a narrow pocket. Insert a seafood fork or pick along the edge and ease it forward.
Inspect every piece under good light. Turn it over and check its folds and edges for visible shell. Fragments may cling to the moist surface or become embedded when the shell breaks.
If you find a fragment:
- Set the meat on the plate.
- Remove the fragment with your fingers or the tip of the seafood pick.
- Check the surrounding area for additional pieces.
- Clear shell debris from the plate before adding more extracted meat.
You may also encounter firm material that is clearly not meat. Separate it rather than biting through it. The available evidence does not support a detailed identification guide for every internal membrane or structure, so the practical standard is simple: remove hard, rigid, shell-like, or otherwise non-meat material.
It is not always necessary to detach every bit of shell. A small shell section left at one end can provide a convenient handle for dipping, provided the exposed meat has been inspected.
Handle fractured shell edges carefully. If a shell has shattered, stop tapping and move directly to extraction and inspection rather than creating more debris.
The extracted meat can be eaten immediately or placed on a chilled serving platter while you finish opening the remaining claws.
Serve stone crab chilled—or warm cooked claws only briefly
Chilled service is the customary default across the surveyed retailer and culinary sources, not an objective rule that cold stone crab tastes better to everyone.
For a simple cold presentation:
- Confirm that the claws are cooked and thawed.
- Keep them chilled until close to serving.
- Arrange them over ice or on a cold platter.
- Place lemon wedges and sauce bowls nearby.
- Give each diner a shell bowl, seafood fork, and heavy napkin.
- Crack the claws just before serving, or use existing fractures if they arrived pre-cracked.
Avoid burying cracked claws deeply in melting ice.
Some diners prefer verified precooked claws gently warmed. Commercial sources describe brief steaming, low-oven warming, or reduced-power microwaving as optional serving methods. These are not substitutes for confirming whether the claws were cooked in the first place.
For example, Key Largo Fisheries suggests approximately two minutes of steaming, three to five minutes in foil at 350°F, or 30-second intervals at half microwave power. These are seller-specific warming suggestions, not universal food-safety requirements, and they should not override the instructions supplied with your claws. The seller lists those methods in its guide to eating and warming precooked claws.
Whatever method you choose, distinguish warming from cooking raw seafood. A verified precooked claw does not need an entire boiling, steaming, baking, or grilling cycle. Prolonged heating may leave the meat dry or tough.
If the package gives different directions, follow the package. When cooked status is uncertain, do not use gentle warming as a substitute for confirmation from the seller.
Sauces, sides, and a simple stone crab table
Stone crab does not require an elaborate menu. The recurring accompaniments in the culinary sources are mustard sauce, melted butter, and fresh lemon.
Consider tasting a small piece plain before dipping it. This is a serving suggestion, not an etiquette rule; it simply lets you decide how much acidity, richness, or mustard you want with the remaining meat.
A flexible mustard dip can include:
- Mayonnaise
- Dijon mustard
- Fresh lemon juice
- A small amount of Worcestershire sauce
- Optional hot sauce
- Optional prepared horseradish
Start with mayonnaise as the base. Add Dijon gradually, then brighten the mixture with lemon juice. Use Worcestershire sparingly so it does not dominate. Hot sauce or horseradish can add heat, but neither is essential.
Melted butter may be served plain or finished with lemon. Use small, wide sauce bowls so diners can dip the exposed meat rather than covering the entire platter.
Simple side options include:
- A crisp green salad
- Coleslaw
- Roasted potatoes
- Roasted vegetables
- Asparagus
- Crusty bread
- Fresh fruit
- A light rice dish
These sides support the meal without requiring the crab to be mixed into a heavier preparation. Palm Beach Lobsters includes salads, asparagus, roasted vegetables, coleslaw, fruit, and light rice dishes among its suggestions in a stone crab serving guide.
At the table, give each diner a clear working area. Place the shared claw platter in the center, arrange sauce bowls around it, and keep shell bowls within easy reach. Heavy napkins are more practical than light cocktail napkins when diners are peeling their own claws.
Planning quantities is imprecise because much of each claw’s weight is shell. Appetite, claw size, side dishes, and whether the crab is an appetizer or main course all affect how much is needed. A meal with salad, bread, vegetables, or potatoes will generally stretch the platter further than a crab-only course.
Troubleshooting common stone crab problems
Even with careful preparation, shells do not always open neatly. The usual solution is to stop, reassess, and change the angle rather than applying much more force.
The shell shattered. Stop cracking. Transfer the exposed meat to a separate plate and inspect it under strong light. Turn each piece over and remove every visible fragment before serving it. Clear loose shell debris from the work area before continuing.
The knuckle meat is stuck. Do not pull harder. Return the knuckle to the stable surface, cover it with the towel, and add one controlled fracture at another point. Peel the newly loosened shell and slide a seafood pick along the inside edge.
The claw will not open. Reposition it so the rounded shell rests securely. Turn it over and add a fracture on the opposite side. A claw that resists at one angle may release after pressure is distributed across two or three points.
The meat was crushed. Separate it from the shell and inspect it closely. Broken meat can still be served in a small dish or eaten with a seafood fork. Do not continue pulverizing the surrounding shell in an attempt to preserve one large piece.
The claw was heated too long. Follow the product’s handling directions and, if it is still to be served under those directions, pair it with lemon, melted butter, or mustard sauce rather than heating it again.
The claws arrived pre-cracked. Examine the existing fractures and begin peeling there. Use a cracker only if a particular compartment remains inaccessible.
The shell comes off, but firm material remains attached. Place the piece on the plate and separate the hard non-meat material before eating. Do not bite through an unidentified rigid section merely to keep the meat intact.
Shell fragments are scattered across the work area. Pause extraction, move the meat plate and sauces aside, collect the large shell pieces, and clear the surface. Inspect any exposed food nearby before returning it to the table.
The main mistakes to avoid are:
- Smashing instead of fracturing
- Cracking a claw in the air
- Striking while holding the claw in one hand
- Using an uncontrolled tool
- Continuing after the shell is loose enough to peel
- Pulling stuck meat forcefully
- Overhandling exposed meat
- Skipping the shell-fragment check
Frequently asked questions
Are stone crab claws already cooked when you buy them?
Many commercially purchased stone crab claws are sold fully cooked and chilled or frozen, but this is not universal. Check the package, retailer listing, seafood-counter label, or seller’s instructions before eating them.
If the seller identifies them as cooked and chilled, serve them according to the product directions. If they are cooked and frozen, thaw them as directed—commonly in the refrigerator—before cracking. If their condition is uncertain, do not rely on appearance alone.
Can I eat stone crab claws cold?
Yes. Verified cooked stone crab claws are commonly served chilled, often over ice with mustard sauce, melted butter, or lemon.
Cold service is a customary presentation in the surveyed culinary guidance. Brief warming is optional when the product’s instructions permit it.
How do I open stone crab claws without a crab cracker?
Place the claw flat on a stable cutting board and cover it completely with a folded towel. Use the back of a sturdy large spoon to make several light, controlled taps on the thick main chamber and each knuckle. Turn the claw and repeat on the opposite side if needed.
Do not hold the claw while tapping it. This guide does not recommend a chef’s knife or general-purpose household hammer as a routine beginner method.
What part of a stone crab do people usually eat?
People primarily eat the meat inside the claws and attached knuckle sections. The claws are the principal commercial product and the customary focus of a stone crab meal.
Some body meat may be edible, but the culinary sources describe it as less substantial and more difficult to extract than claw meat.
When is stone crab season in Florida?
Florida’s legal stone crab harvest season runs from October 15 through May 1, according to the Florida Fish and Wildlife Conservation Commission’s stone crab FAQ. Those dates apply to harvesting in Florida, not necessarily to another jurisdiction, and regulations may change.
Stone crabs can regenerate lost claws over successive molts, but regeneration does not mean harvesting is consequence-free. The Florida agency explains that survival depends partly on wound condition and how the claw is removed.
The three principles to remember: Confirm that the claws are cooked, create controlled fractures on a stable towel-covered surface, and inspect every extracted piece before eating it. Chilled service with mustard sauce, butter, or lemon is customary; warming and other presentation choices are optional and should follow the instructions supplied with the product.